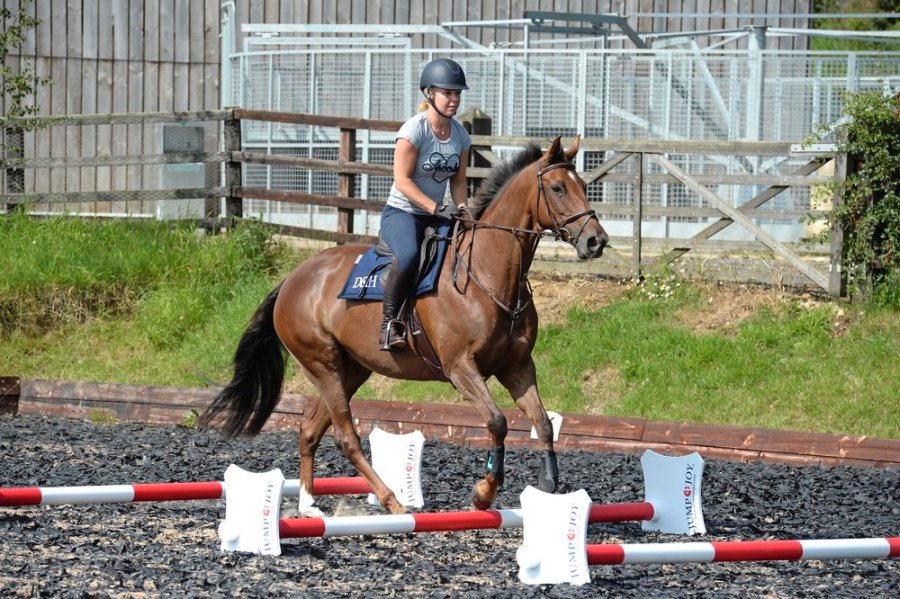
Riders of a certain age will remember the hours spent trotting over heavy, wooden cavaletti while learning to ride.
Although they’ve been out of fashion for a while, the humble cavaletti can provide an effective and active workout for every horse and rider. In fact, Richard Waygood MBE, eventing performance manager for Team GB, is a huge fan of cavaletti and he believes that any horse can benefit from working over them.
What are cavaletti?
Invented by cavalry officer Federico Caprilli, cavaletti are designed to help with suppleness, balance, impulsion and stride adjustment.
Cavaletti poles (meaning ‘little horse’ from the Italian cavallo) are small jumps with a rail or pole fixed at each end to an X or block, so they can’t be knocked down.
By rotating them onto different sides, the height can be adjusted from 4-24 inches.
Originally made of wood, which you still see, modern cavaletti are usually made from strong, synthetic materials. They should be heavy enough that they don’t roll easily if knocked, but still move out of the way if tripped over or hit with force.
Newer types of cavaletti are easy to move and transport, making them an ideal training aid whatever you do with your horse.
Exercise 1: engage the hindleg
Make sure your horse is properly warmed up before you start. Trot over a pole on the ground a few times too.
“This first exercise is extremely useful,” says Richard. “It includes a curving line, so it effectively engages your horse’s inside hindleg and develops elevation and impulsion. This is important for both dressage and jumping.”
How to set it up
Place four cavaletti on a trotting pole distance on the three-quarter line of your arena.
Then add two poles, one at each end, at right angles so that they lie along the centre line, as shown in the diagram below:
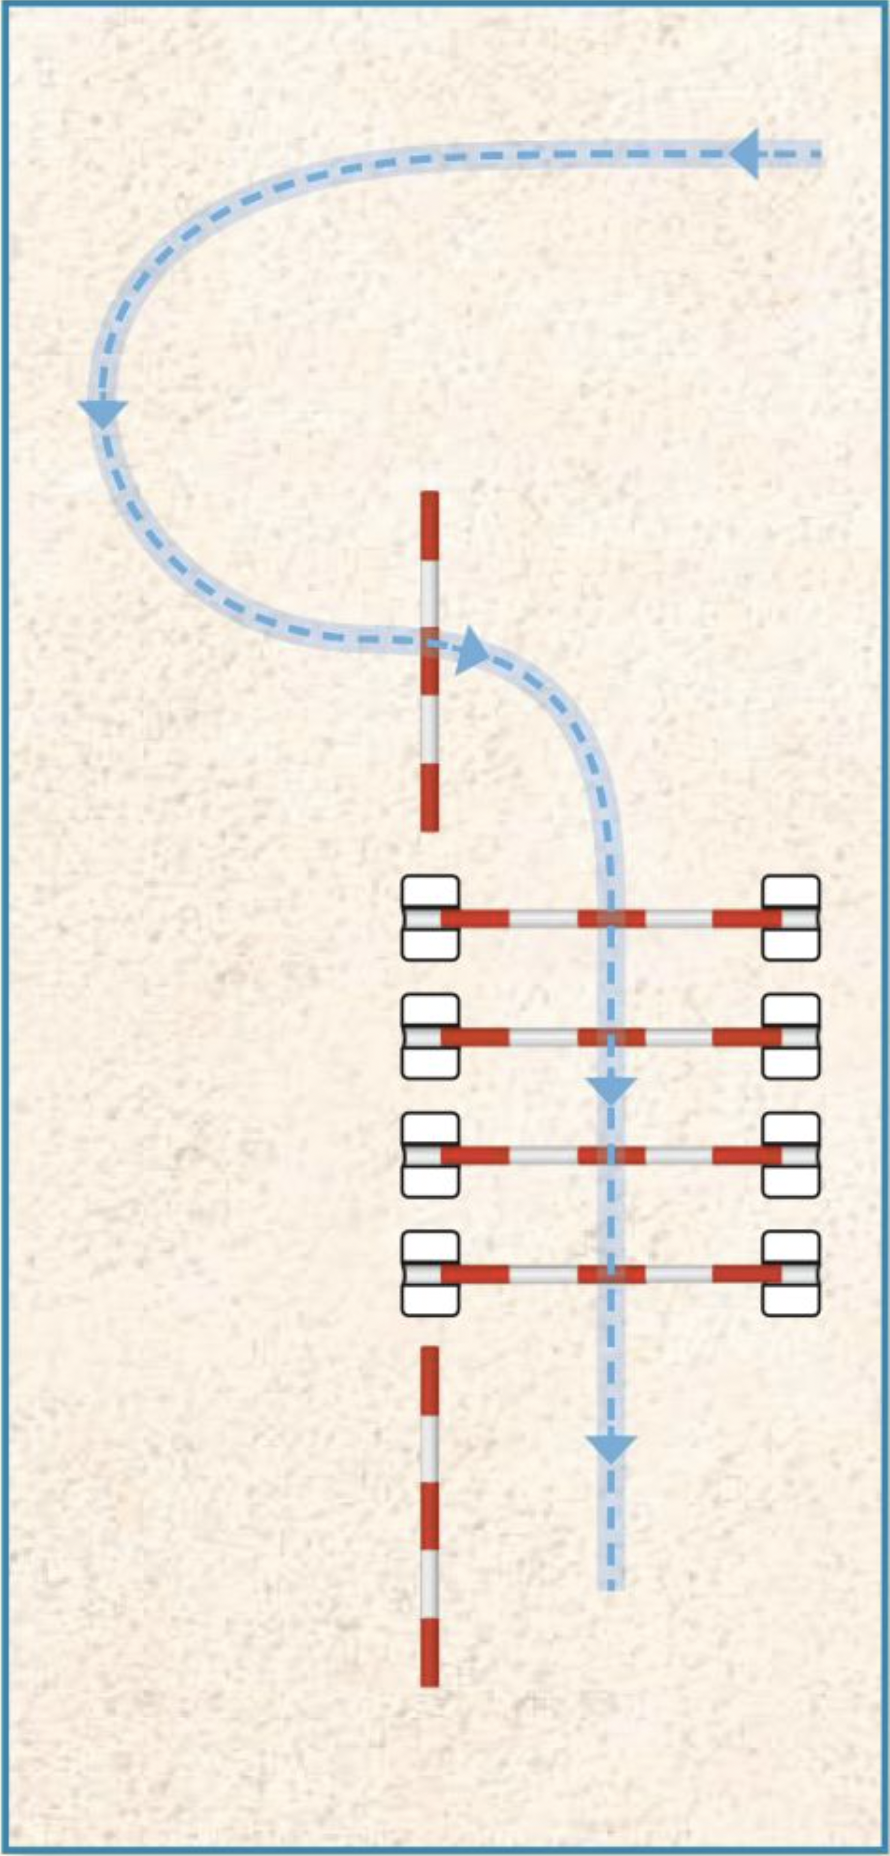
How to ride it
- In trot, ride over the ground pole and then turn to ride over the line of cavaletti. Aim for the middle of the cavaletti and keep straight the whole way through.
- “Think about your entry in advance, as you’ll be turning as you go over the pole. Your horse will bend through their body, increasing their suppleness,” advises Richard.
- Keep your horse moving forward, but without rushing them.
- Allow them to lower their neck to look at the cavaletti, which will also enable them to use their topline correctly.
- Half-halt as you ride the line to create more elasticity, staying relaxed and soft in your hands.
- Ride straight through the line and out the other side.
- Repeat this and vary the exercise by approaching from both ends. Remember to turn to the ground pole off both reins too.
“This exercise is a good introduction to tackling angles and tricky lines too,” says Richard. “Tackling cavaletti at any height is a great exercise for developing cadence, impulsion and topline, as your horse has to work on lifting their legs that bit higher.”
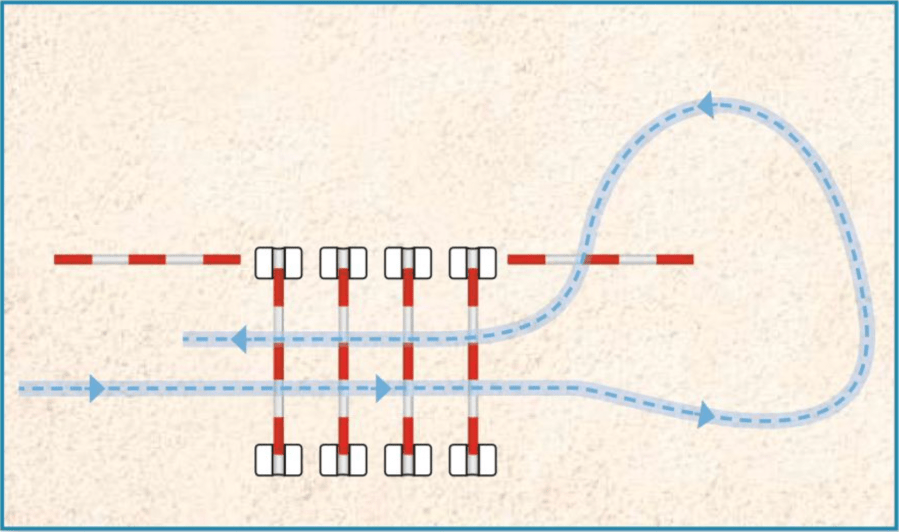
Exercise 2: controlling the outside shoulder
Continue with the ground poles and cavaletti laid out as in exercise one.
This time, ride a teardrop shape after the cavaletti, circling around to the ground pole, trotting over it and continuing on over the line of cavaletti (see diagram, below).
“By riding a teardrop at both ends, it allows you to ride a number of repetitions and tackle suppleness and accuracy,” explains Richard.
To perfect this exercise, as you ride over the pole on entry, see if you can get your turn perfectly balanced, with the angle small enough that your horse puts just one front foot into the corner between the pole and the first cavaletti.
This makes you focus on controlling your horse’s outside shoulder.
Exercise 3: suppleness and accuracy
This exercise requires you to ride over four cavaletti on a circle. It is really good for improving suppleness and accuracy.
How to set it up
Set up four cavaletti, placing one at each point of a 20m circle.
How to ride it
“You can use the circle in lots of ways, just use your imagination,” says Richard. “For instance, in canter, ride an inside or outside line over the cavaletti, which will require your horse to shorten or lengthen their stride accordingly.
“You could ride a different number of strides between the cavaletti on each repetition.
“Decide how many you’re going to get in before you start and then ride for them. This will mean you (and the horse) learn to shorten or lengthen the stride accordingly.”
Remember to regularly change the rein and do the same exercise equally on both sides.
“The key with this exercise is to make sure you don’t let your horse fall out through their outside shoulder,” adds Richard. “Their back feet should always follow their front feet, so they have a uniform bend through their body from nose to tail.”
Exercise 4: bounce cavaletti
Place three cavaletti on a bounce distance along the long side of your training area. Leave four or five non-jumping strides and then add another three cavaletti on a bounce distance.
“This is one of the best gymnastic exercises you can do — it’s great for strength and conditioning,” says Richard. “It’s ridden in canter and the rider’s job is to keep the rhythm and balance through the line.”
You can ride this exercise in collected or medium canter but, whichever you choose, you must maintain the impulsion and keep your horse in front of your leg.
“The distance of the bounces depends on what you’re trying to achieve,” explains Richard.
“For instance, if you’re working on activating your horse’s hindleg, you might want the distances shorter, so your horse works over their back.
“To develop medium canter, the cavaletti will need to be a little further apart.”
Ride through the whole line, maintaining the forward momentum. Make sure you don’t confuse speed with impulsion.
Exercise 5: regulating rhythm
Richard often uses raised cavaletti as placing poles before and after a fence. The extra height (compared to a ground pole) helps to focus the horse’s attention.
“Place one raised cavaletti three to four strides in front of the fence,” says Richard.
“Then place another one on the landing side — for safety’s sake, this should be at a slightly more generous distance.
“The landing cavaletti helps your horse to stay straight and keep the same rhythm before and after the fence, which is important when jumping a course.
“It also stops them from opening up their frame and getting too long as they canter away.”
This exercise is also excellent for regulating your horse’s speed.
“If you’re working with a 12ft canter stride, which for argument’s sake we’ll call 12mph, this is the speed you should keep throughout.
“The placing poles help to stop your horse getting faster and flatter, which isn’t a great combination when you’re jumping.”
Even if your horse isn’t a showjumper, this exercise teamed with a small cross pole is a useful way to teach a horse how to regulate their paces and develop impulsion.
Exercise 6: teaching self-carriage
Richard’s final exercise is more advanced, but one of the best for teaching your horse self-carriage.
How to set it up
Create a ‘+’ shape with four cavaletti, each one touching at the centre of the +, as shown in the diagram below:
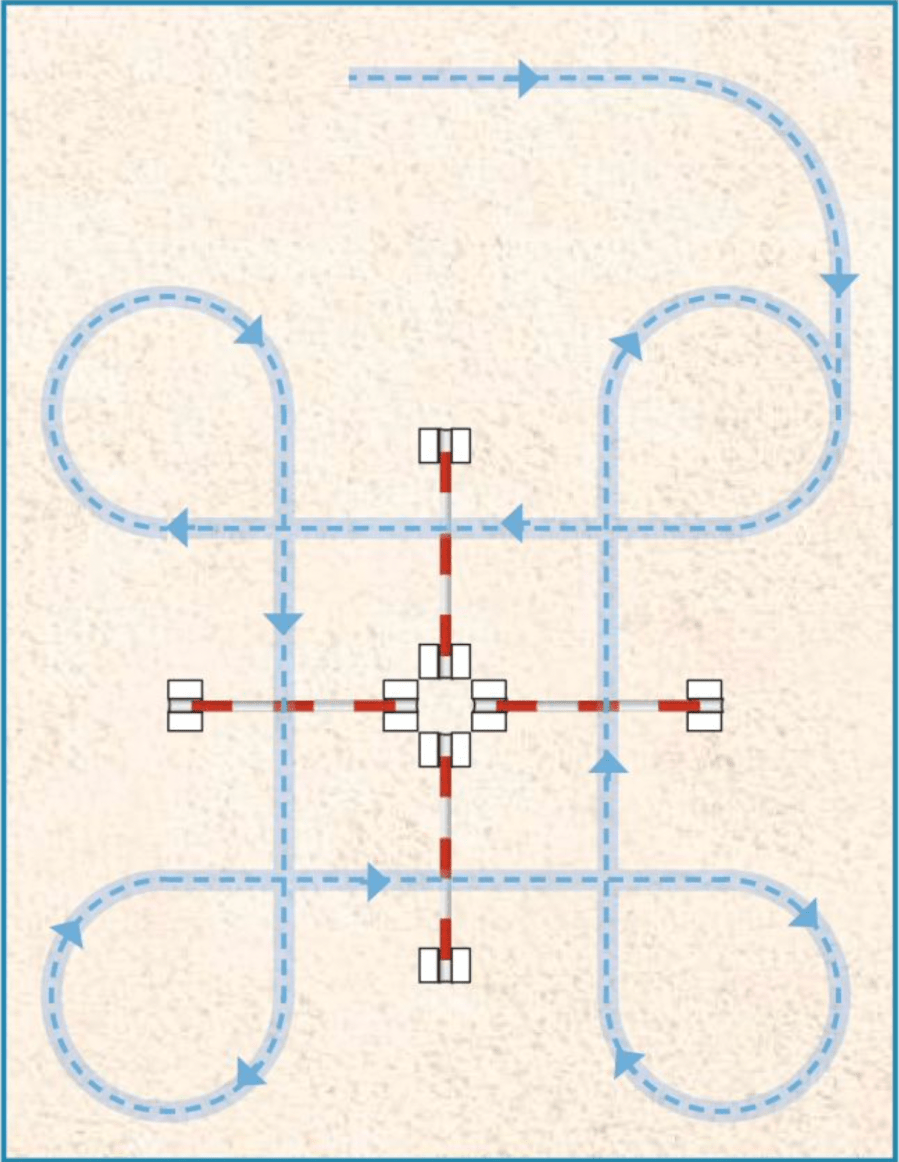
How to ride it
- Think of each ‘L’ of the cavaletti as a square box. You can see two of the edges; the other two are invisible.
- Ride a large circle around the outside of the four cavaletti.
- Move onto a smaller circle within one of the boxes of the X. Don’t worry if your circle takes you outside of the invisible box edges, especially on a young/inexperienced horse.
- Continue on the small circle until your horse is balanced and in self-carriage (only ask for as much as your horse is capable of).
- Jump a cavaletti into the next box.
- Ride a small circle again on the same rein.
- Repeat until you’ve circled in all four boxes. Then give your horse a break.
- Repeat on the other rein.
Thinking ahead
With practise and repetition, your horse will learn to go into self-carriage earlier each time they land over the cavaletti. This will translate into more consistency when jumping a course.
It’s the circles that put the balance back into the canter. The horse will land and immediately find their self-carriage.
“The more challenging you want to make this exercise, the smaller you can make your circles,” says Richard.
“To advance this exercise further, ask your horse for a change of leg when you go over the cavaletti and then circle on the other rein.”
If this exercise proves too difficult for your horse, enter the box in canter, ride a couple of circles and then exit again.
Practise until you feel your horse is ready for the full challenge.
Cavaletti: safety considerations
- For safety reasons, cavaletti should never be stacked on top of each other.
- The poles used should be heavy enough that they don’t get kicked along by the horse if they touch them.
- Use cavaletti only for the purpose they were designed for.
- If your horse gets bored, they may start to trip. If this happens, go away and do something else, then come back to them.
- Think outside the box and you’ll be able to adapt Richard’s exercises to suit your needs and goals.
- Remember that cavaletti are only a useful piece of training equipment when used correctly.
Main image and diagrams © Your Horse Library/Kelsey Media Ltd