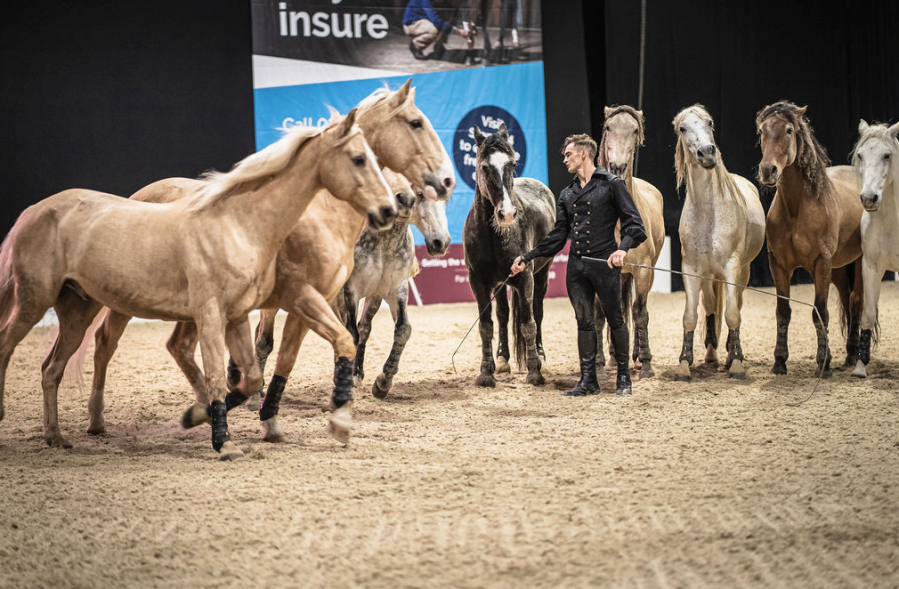
Whether you are watching a master Liberty trainer like Ben Atkinson at work at Your Horse Live or you are trying it at home with your own horse, there is something very special about liberty horse training. It is a real thrill to see a horse work with a human completely freely.
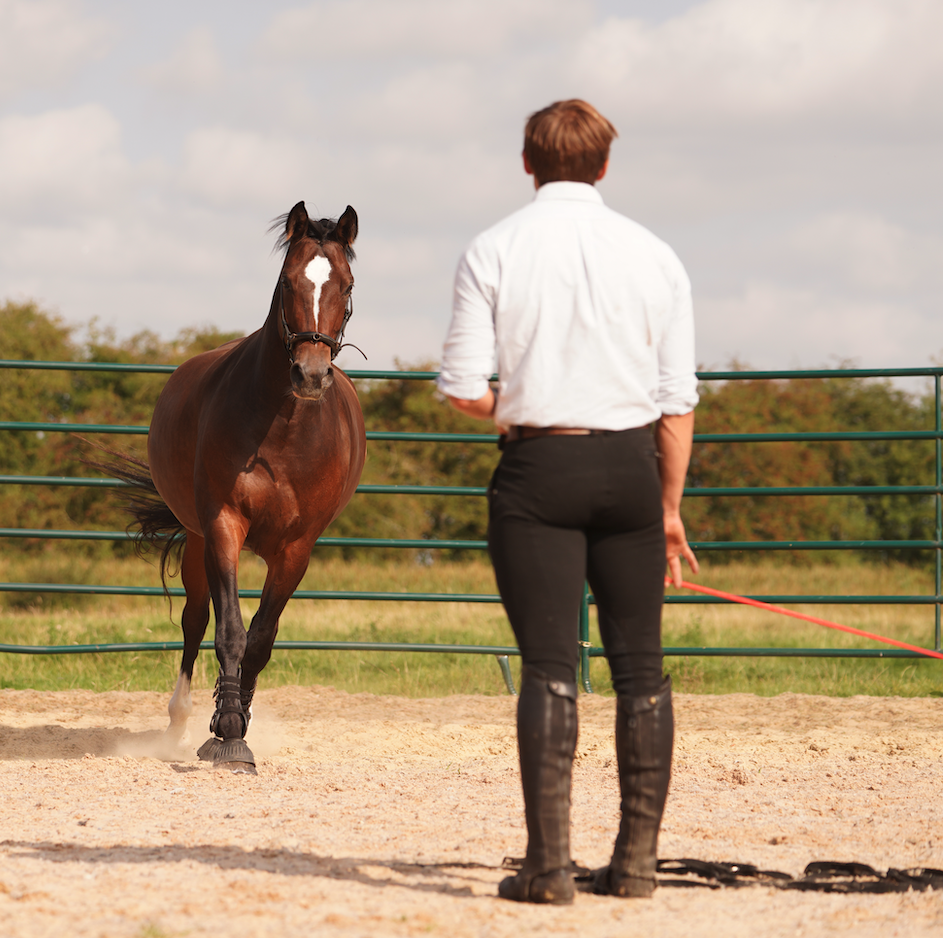
To truly be at liberty, a horse is free from tack (not even a headcollar) and has no restrictions.
Yet they can be so tuned into their trainer that they move seamlessly from one ‘trick’ to another, totally focused on the next command.
The communication is clear and smooth and horses willingly gallop, leap, rear and lie down for their trainer, totally trusting in what is being asked of them.
Such horses are never forced to do anything; they have total autonomy and yet choose to carry out the things being asked of them.
To have that level of trust and respect between horse and human is the ultimate goal.
Benefits of liberty
As well as offering something new to your horse in terms of training and improving your bond, liberty horse training can offer other benefits.
“Everyone who meets my liberty horses wants to take them home because they’re so beautiful to handle on the ground,” says Ben.
“When you stop, they stop. You don’t need to pull or force them.”
Having a horse that is safe to handle also means that they are safe to ride and train.
“A big part of liberty is called ‘being the rock in the stream’.
“The human is a large boulder and the horse is the stream. While the human doesn’t move, the horse meanders like water around the human,” explains Ben.
“You want the horse to move around you, but never into or over you.”
Bonding
Ben was four years old when he first witnessed horses working at liberty.
He explains that liberty horse training removes all the kicking and pulling from a rider/handler.
It means that you can show the horse what you want on the floor before you get on board.
“Equally, if you teach a horse these movements on the floor first, whether that’s a young horse or an older horse, you as the trainer and rider can see which rein the horse struggles on most,” he says.
“You can see which legs move where, which movements the horse finds difficult, and where they’re getting in a tangle.
“This allows you to view your horse in the same way that your instructor can.”
Liberty horse training is also transferable.
“For example, if you teach your horse to do hind quarters towards you, you can teach any horse to line up to a mounting block and stand up beautifully while you get on,” says Ben.
“For riders, this opens up the door to teaching horses more complex movements, such as piaffe and passage, where there need never be resistance or confusion.”
Suitable horses
Any age, breed, or type of horse from any discipline can be taught to work at liberty.
“I don’t care if they’re a wild pony off the New Forest or a chunky cob, the horse will tell you what they are talented at,” says Ben.
“Liberty is great for any horse because it gives them a clear route of communication and reliability.
“For horses who have experienced trauma, liberty teaches them that the pressure is off and they will never be made to do anything until they’re ready.
“I had a mare who napped and we taught her vocal cues and physical cues for acceleration, which meant that when we rode her again the napping vanished.”
Horses are creatures of logic, and all you’re doing is putting the information to them in a way that they understand and so those problems evaporate.
- For horses who are ‘lazy’ or ‘unreactive’, liberty will teach them to be responsive to lighter aids.
- For sharp horses who like to let off steam at the start of a session, allowing them to work at liberty before you ride them will let them get rid of that negative energy before you climb into the saddle.
Liberty aids
Just like the times we ride and handle horses, liberty uses aids to signify what we want the horse to do.
The signals you use in liberty horse training are your false aids, such as the whip, vocal aids like a whistle or your voice, and your body language, such as your positioning and footwork.
“By being precise with your footwork, you can teach a horse when they can step towards you and when they shouldn’t.
“Then when our horses spook at something they can still explode, but they won’t move into the human’s space as they know that human won’t move,” states Ben.
As with any horse training, the ultimate goal of liberty is to get the horse to react to the lightest aid or touch.
“The horses end up beautifully light, but only if they are trained light, so always start with the lightest aid and gradually build up until you get the response you want, and then release at the first sign of movement,” adds Ben.
The three ‘Cs’
To check that you are training in the right way, Ben suggests checking the three Cs:
- Clarity: Be clear in your goal and how you are going to ask for it.
- Consistency: Consistently ask for the same movement or behaviour in the same way.
- Confidence: If you keep asking in the same way, the horse will become confident in a movement or behaviour.
It’s not just about the horse either.
“Liberty is a two-player game — it’s 70% human and 30% horse,” says Ben.
“Liberty doesn’t stop when you leave the arena. It continues with how you handle your horse in the stable, lead them and tie them up for the farrier, and catch them from the field and bring them in.
“Liberty horse training is a form of communication that is always the same. It’s the absolute clarity that allows the horse to become so relaxed because they know what the rules are, and they know what they should and shouldn’t do.”
Human vs horse mindset
When working at liberty with your horse, it is important to understand that the human mind works in very different ways.
“The horse is a prey animal and will think about several things at once. They can’t just concentrate on eating because otherwise they’ll be eaten by a predator,” explains Ben.
“Humans are hunter and so will only concentrate on one thing at a time.
“We want to break down the barrier between horse and human. The human has to decide to open up more to the world around them and see like a horse does.”
Personal development
People often aren’t aware of the personal development that comes with liberty.
“It can really open people’s minds to their own emotional regulation,” says Ben.
“Our horses see us as their leader and look to us for reassurance if something is wrong.
“Therefore, we need to be able to control our own emotions. I find that breathing can help to do this — breathing in for four seconds and breathing out for four is such a simple way to ground yourself.
“It always helps to exhale longer than you inhale — your body will believe it is a safe place.
“If the horse gets scared, we need to stay monotone and calm regardless of what happens.”
Ben adds that an owner reserves the right to walk away.
If you become upset or heated about something, it is best to take a few minutes out to calm down and reset.
“I use songs and music to calm down and get mentally prepared for liberty sessions,” he says.
Getting started
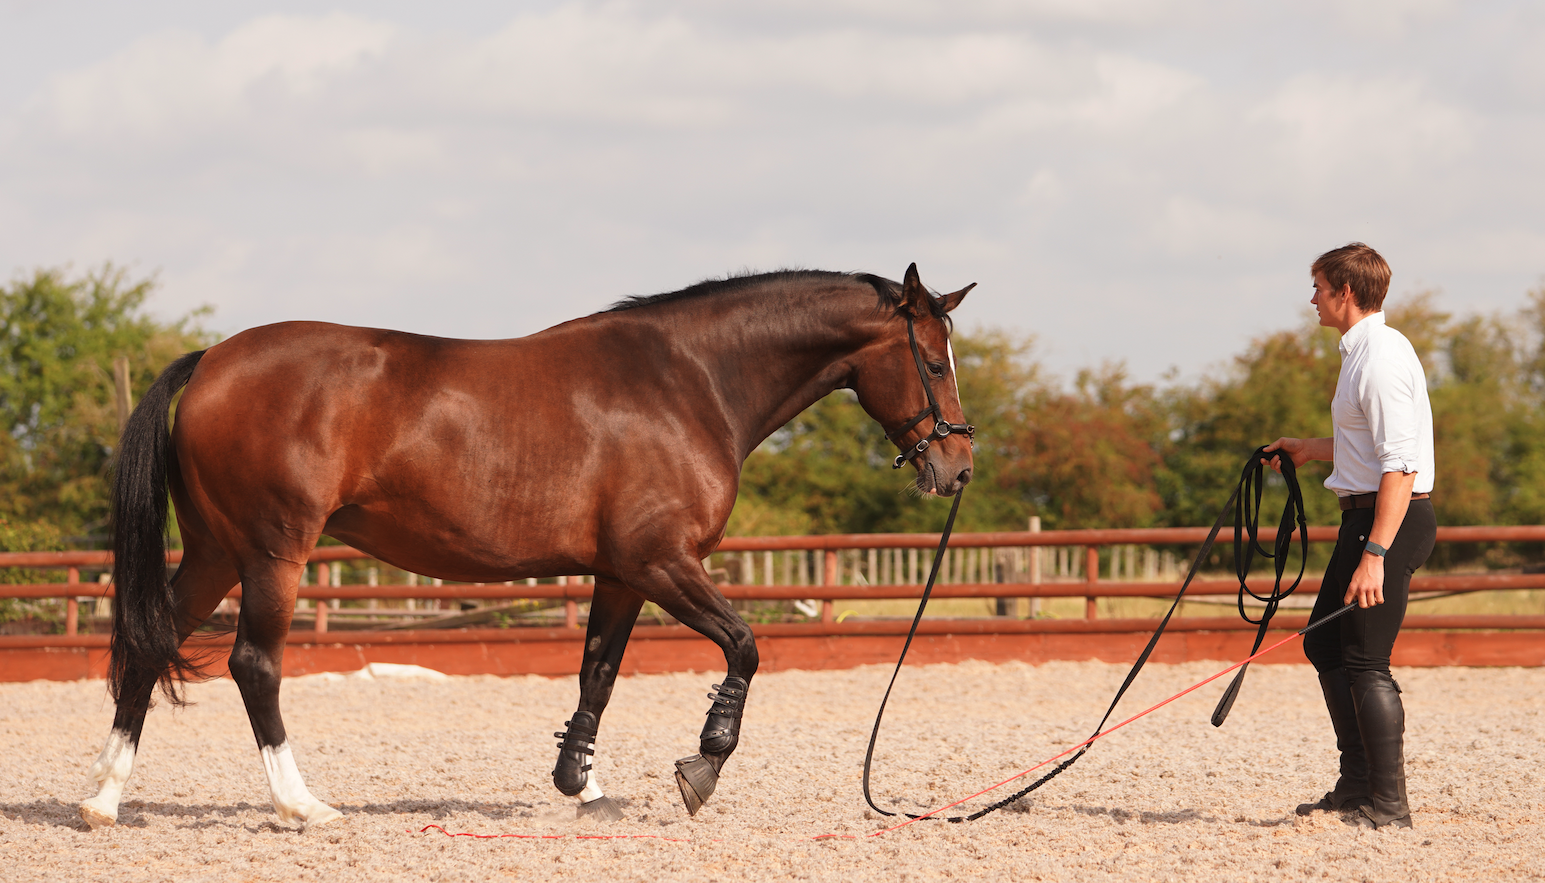
If you fancy having a go at liberty horse training, you don’t need any special equipment — just a simple headcollar, a lead rope, and a schooling whip, plus a secure place to work.
“These exercises might seem basic, but they are your essential tools and without them liberty won’t work,” says Ben.
“To start with, you want to be able to move the horse forwards and backwards, move their hindquarters towards and away from you, their shoulders away and towards you and move them fully sideways towards and away from you from both sides.”
Exercise 1: Quarters away
This is one of the first times a horse might be asked to move backwards away from you and not forwards into you, so it’s a very important early lesson.
It also teaches them that whenever energy is added to an exercise, it never means walking on top of the human.
You’re aiming for the horse to be travelling around the human like the hands of a clock, so that their tail is on the outside with their head facing you.
They should step sideways while you stand in the middle, turning with them.
How to do it
Ben explains:
- It’s important that you stay in the same spot, so start by taking an old lead rope, lay it in a circle on the floor and stand inside it.
- Ask your horse to move away from the whip. Start by flexing the horse’s head with the halter towards the same side as you — a bit of inside flexion — and then point the schooling whip towards the thigh just above the hock.
- If the horse won’t move away from the stick, wiggle the whip until it makes a sound.
- If they step away, even just an inch, praise them. How you praise is important. “I go for a scratch on the forehead, but it could be a scratch on the neck, stomach, or bottom,” says Ben.
- If they still haven’t moved, tap them with the whip in a different place, or use a different rhythm.
- If that still doesn’t work, go for the old fashioned plastic bag on the end of the whip, which makes more noise. Then gradually start using the normal stick with the same commands until the horse moves away from the normal stick.
- Practise in both directions, performing a full circle on each rein.
“By doing this we have taught the horse to move away from pressure, but not simply by escalating the pressure. We’ve just used a different pressure,” explains Ben.
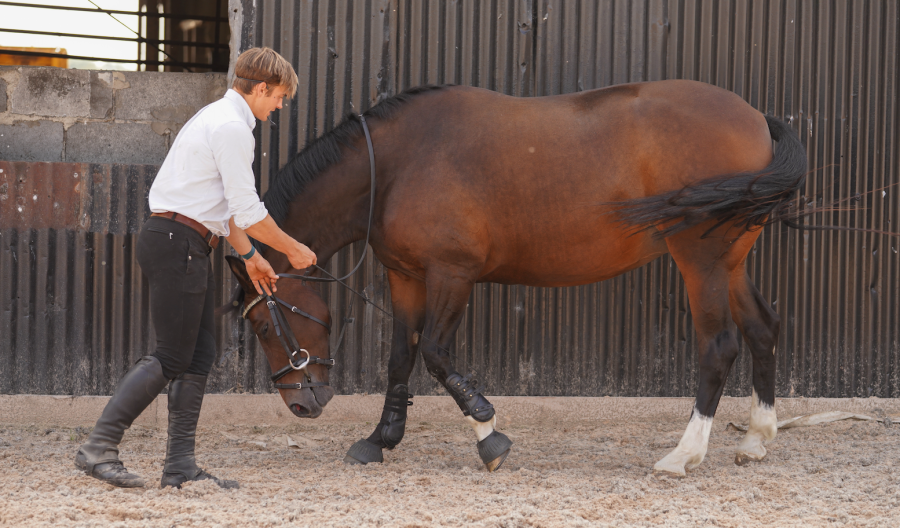
Exercise 2: Backing up
Backing up teaches the horse to move away from the handler instead of forwards and into them.
How to do it
Ben explains:
- Position the horse against a fence while you stand with your chest in line with their eye.
- If the horse is standing with their off side against the rail, and you’re on the nearside with your chest level with their eye, carry the leadrope in your right hand and the stick in your left hand.
- Lift the stick about 1m up in front of the horse as far away as you can reach and make that swishing sound with the whip.
- If they lean back or take a step back, stop and praise them.
- Practise using less of a reaction to get them to move backwards.
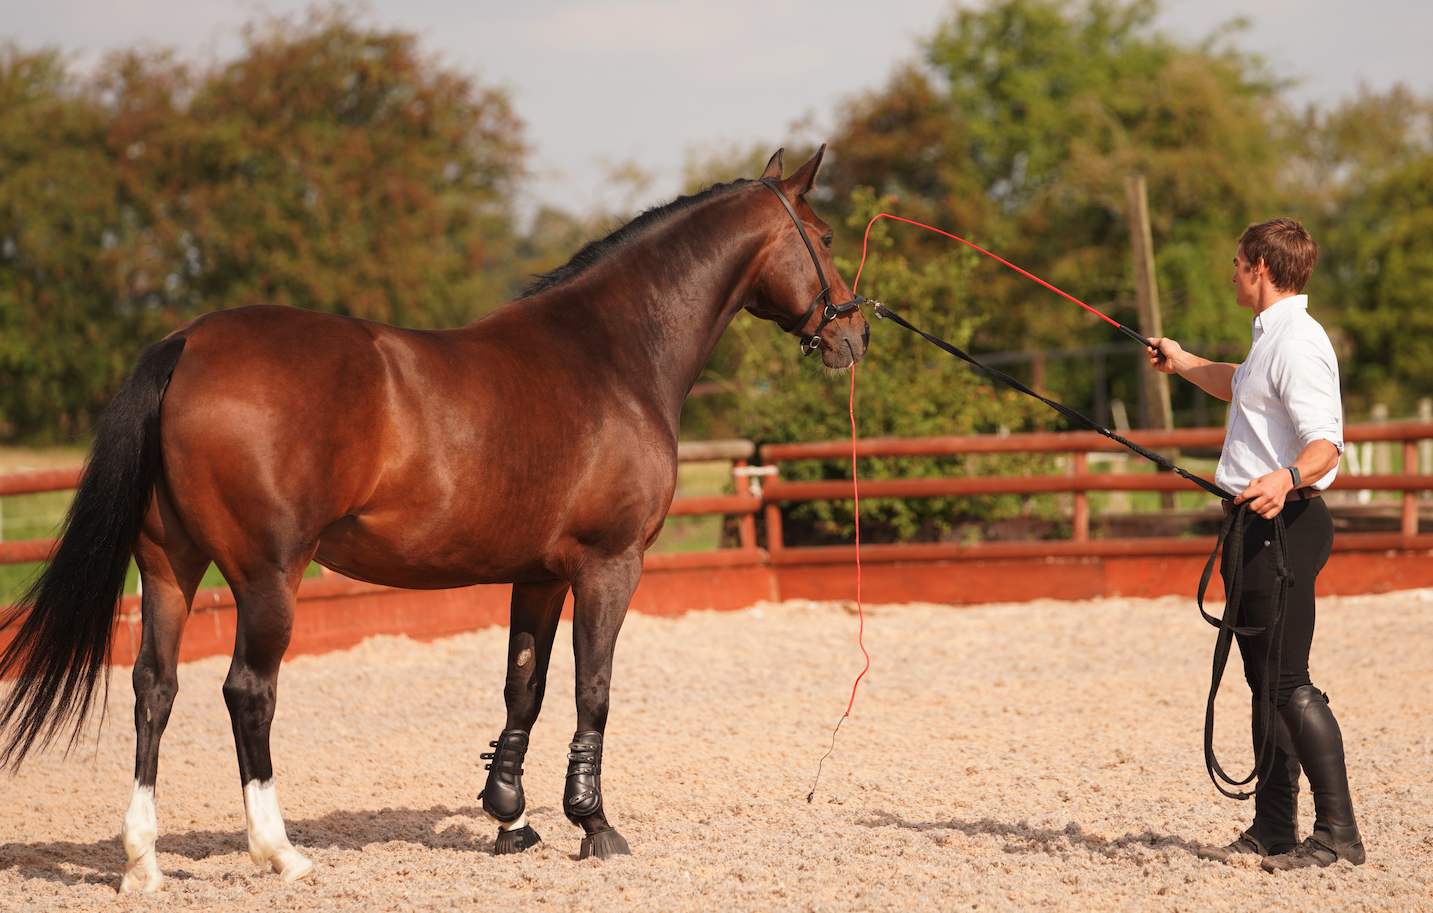
Exercise 3: Send away and recall
Send away and recall does what it says on the tin: you teach your horse to go away from you and then teach them a command to come back to you.
You begin on the lunge and then progress to loose schooling — this is the very beginnings of true liberty horse training.
To begin with, you will require a headcollar or cavesson, a lunge line and a lunge whip.
How to do it
Ben explains:
Starting position
Start by standing facing your horse’s shoulder. Then ask them to go on a circle on the lunge anti-clockwise.
“My signal for sending a horse out onto a circle is to hold the lunge line in my left hand and lunge whip in my right hand,” advises Ben.
“Then I gently lay my left hand flat on the horse’s check and point and push to the outside of the circle.
“As I do that, I’m going to point the lunge whip towards the floor behind the horse — 1m away.”
The idea behind the push and point is that you open your left shoulder and close the door with your right shoulder, while the whip is creating energy to ask the horse to accelerate onto the circle.
TOP TIP!
Never touch the horse with the whip. This is all about creating energy with the whip.
The drive line
Horses have what we call a ‘drive line’ and this is the line where the girth sits.
Pressure in front of the drive line is going to slow down the horse. Pressure behind the drive line is going to speed them up.
“Horses are also all about intention; they are prey animals and a great example of how we can use this in our training is to imagine that the horse has headlights like a car and that they come out of their chest,” says Ben.
“As a human, our headlights also come out of our chest. Imagine that the beams of light dictate our attention and intention.
“While we’re asking the horse to trot around the circle, we’re going to point our headlights at the horse’s tail.
“Our intention is to drive the horse forward at this point.
“We’re not connecting with them or trying to get their attention. We’re focusing on the section behind the drive line to get the horse to move forwards.”
Following this process also helps to build clarity, consistency and confidence.
It gives clear instructions to the horse what your body and whip is doing.
TOP TIP!
“I always suggest starting this exercise on a smaller circle in walk, but once your horse is established on this small circle, you can make it even bigger,” says Ben.
“You will need to take into consideration the size, age and history of your horse.
“For example, with a big, aged horse with a history of lameness, you will have to adapt your training so that they are on a bigger circle and going slower.”
Getting them to come to you
Once the horse is going round happily, the next step is to get them to come into you.
“Swap hands so that you’re holding the lunge whip in your left hand, still pointing at the horse’s rear end, while the lunge line is in your right hand,” instructs Ben.
“Next you need to leave the centre of the circle and swing your chest so that your headlights point towards the horse’s front end.
“Then gently raise the lunge whip up in front of the horse to stop them on the circle.”
The lunge line
When the horse stops and turns in towards you, walk backwards, keeping the lunge line as slack as possible.
At the same time gather up the excess rope so that the horse doesn’t stand on it and scare themselves.
“What is vitally important is that as you ask the horse to come in, if they’re coming straight at you, you need to then lower the whip because you want to teach them to come straight at you as you walk backwards,” says Ben.
“You don’t want to accidentally push the horse left or right by having the whip pointing at their rear end by accident.”
TOP TIP!
According to Ben, you must have an established back up signal in front (see exercise 2: backing up) because that is the bridge of knowledge that the horse will use when you introduce this exercise so that they don’t feel overwhelmed.
Stopping
Once you have the horse so that you can send them out on the lunge, put the whip in front and they will stop and come to you.
This is when you can begin to add your verbal cue.
“I like a whistle, but you can use any verbal cue you like. I once taught a horse to do this using the word pineapple!,” says Ben.
“It doesn’t matter what the sound is as long as it consistently happens with the movement.
“Don’t, however, add the vocal commands until the horse understands the process with the movement to the signals. Doing so too early means you are using that sound or word in too vague a way before they know what they’re doing.”
Loose and at large
When you get to the point where you can loose school your horse around the arena, hold up your whip and they will stop and come in to you.
Then it’s time to start working with them at liberty.
“Stroke them all over and then give a click,” says Ben. “After that, begin to walk off and hopefully the horse will walk with you.
“You might get two or three steps to begin with, after which you should praise them.
“Later you can built it up and start to add turns and transitions.
“If you get these few steps with your horse and they go off, go straight back into loose schooling around the arena, asking them to come back to you.
Recall
Once your horse has understood the concept of send away and recall, you can progress this ‘next to me’ work.
“A common issue when doing this type of work is that the horse heads off in the opposite direction to you, but this isn’t a big deal and is going to happen,” muses Ben.
“It is no different to a showjumper knocking down a pole or a dressage horse striking off on the wrong canter lead. It is part of the process.
“Simply make your ‘come to me’ command until you have your horse’s attention back again.”
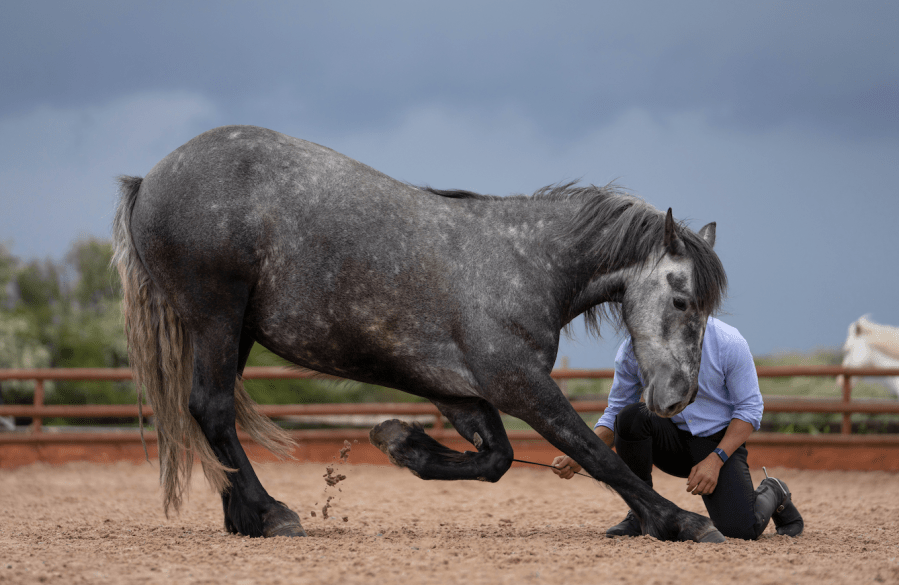
Exercise 4: The bow
The bow is a downwards and backwards liberty horse training movement.
Once a horse has learned to bow, they can then progress to kneeling and subsequently lying down.
The method a liberty trainer uses to teach the bow garners the same result as horses together in play.
When they go to bite each other’s legs and go to kneel down. It is this that we tap into to teach the bow.
How to ask for it
Ben explains:
Yielding the head
Stand your horse against the arena fence and start by working on the yielding of their head with the halter.
“You need to apply downward pressure with the lead rope and pulse on the lead rope,” says Ben.
“The moment they lower their head, even a single centimetre, you need to stop and praise them.”
Lowering the head
Next you want the horse to lower their head so you apply backward pressure on the halter and a bit of pressure from your hand onto the horse’s head to encourage them to lower it.
Then take a couple of steps backwards.
“You don’t need to go miles because you don’t want the horse to think that the aim of this exercise is to walk backwards.
“You just want them to think down and back,” adds Ben.
Downward flexion
Hold the horse’s headcollar and lead rope, and ask for downward flexion with backward pressure and tap on the side of their knee until they lift their leg.
“You just want a bend of the knee, not an extension outwards, so stop asking when the horse lifts and holds it,” says Ben.
“The aim is to tap their knee and get them to hold their leg at a 45°-90° angle with their hoof under their belly.”
Putting it together
Once your horse starts to understand the concept, you are going to start to put these two things together.
- Tap the side of their knee for a bend.
- At the same time as you ask for that downward flexion in their neck and a rock backwards.
Asking for more
Slowly increase the tilt backwards and lower their shoulder. Then stop and praise. You are looking for these little milestones to mark.
Take a bow
Once your horse is going down so that they are touching their cannon bone to the floor, use the same training mindset you used to increase the depth of the bow to increase the length of it.
Remain calm and persistent when holding the bow.
Top tips for liberty horse training: top tips
One direction
When you are loose schooling around the arena, your horse must stay on the same rein as you started them on unless you ask them to change direction.
Get the right speed
A good hacking trot is more than enough in terms of speed.
If you have an energetic horse who likes to canter, or a fat pony who needs to burn off some calories, let them canter, but otherwise this hacking trot is plenty.
If you push the horse into a gallop and their adrenaline gets too high, they will go into fight or flight mode and will stop learning.
Practise makes perfect
“I liken this to whipping cream,” states Ben.
“It takes time to get it right and, just as with whipped cream, it seems that it’s not working for a while, but as long as you stay consistent and calm, you will get there.
“Some horses learn this in half an hour, but for others it might take weeks. However, it will all come to all of them eventually.
“The important thing is to give clear instructions.”
Don’t overdo it
In the early stages of working your horse loose, keep it short and sweet.
Achieve and then move on, going back to working on your other tools with a halter and leadrope.
Ben Atkinson works alongside his father, Mark, in the family business Atkinson Action Horses, training horses for films and shows, as well as live performances. Ben rode his first display aged 11 and was building his own team of stunt riders and horses by the age of 16. His displays include the art of liberty, classical dressage, airs above the ground and Cossack trick riding. To find out more, visit actionhorses.co.uk
Images © EJ Lazenby